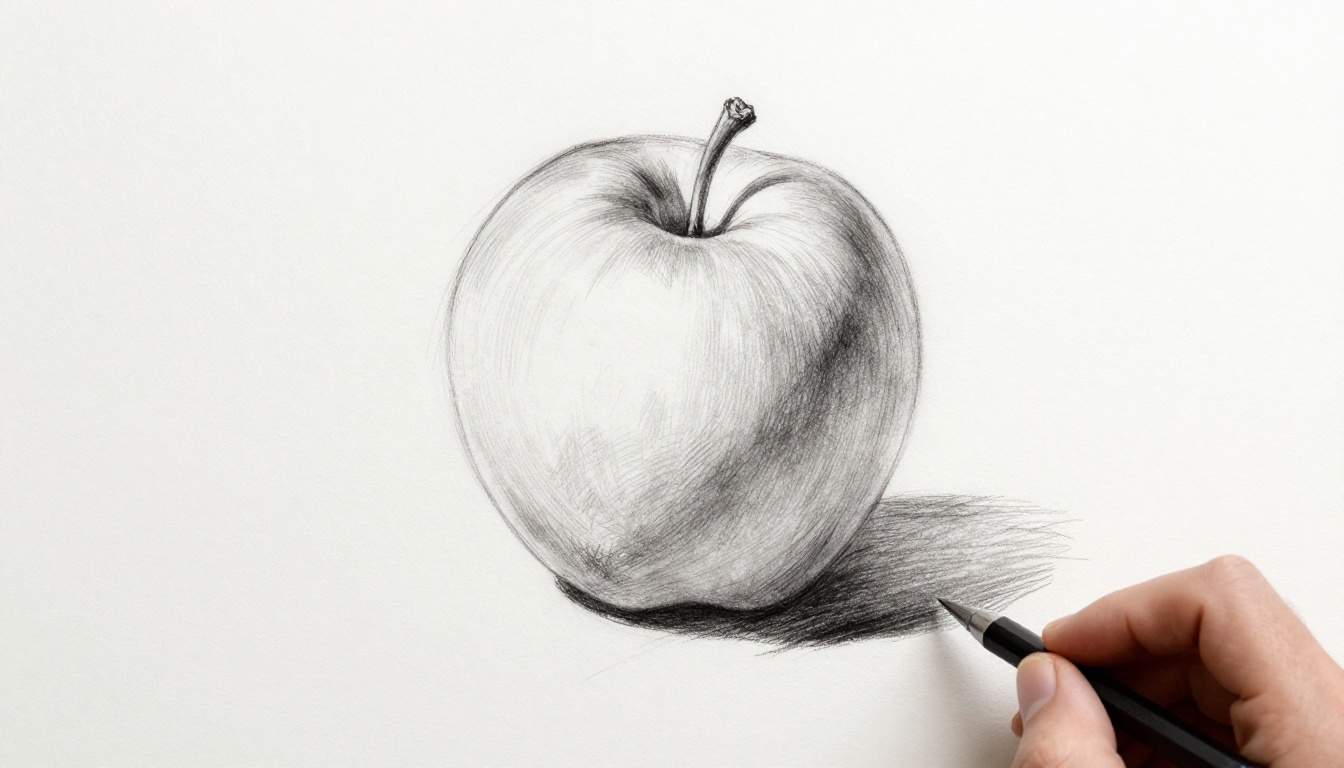
You sketch a simple apple. It lies flat on the page. Then you add shadows. Suddenly, it rounds out and gleams under light. Shading turns two-dimensional lines into three-dimensional forms. It mimics how light hits objects in real life.
Many artists struggle here. Their drawings stay lifeless because they skip light rules or pick wrong tools. You can fix that. This guide covers light basics, proven techniques, a sphere tutorial, scene tips, common errors, and daily drills. Plus, fresh 2026 artist shares on hyper-real blends for photo-like results.
Grab paper, pencils from H to 6B, and an eraser. You’ll shade like a pro by the end. Let’s start with light foundations.
Unlock Depth by Mastering Light and Shadow Basics
Light gives objects form. One source creates key areas: highlights, halftones, core shadows, cast shadows, and reflected light. Closer parts stay bright. Farther ones darken. Think of a ball under a lamp. The top glows. Sides fade. Bottom drops to black.
This setup prevents flat art. Without it, shapes lack volume. Artists in 2026 stress studying real light first. They build layers from light to dark for lifelike depth.
Highlights and Shadows: The Key Players
Highlights catch the brightest light. They shine on rounded tops, like sunlight on an apple’s curve. Core shadows hug the edge where light turns away. They define the form’s turn.
Halftones fill the middle. They bridge bright to dark. Cast shadows stretch away from the object. Reflected light bounces back softly from nearby surfaces. All work together. Pick one light direction. Stick to it. That keeps your drawing consistent.
For example, sunlight on fruit shows crisp highlights. Indoor lamps add softer bounces. Practice spots these fast.
Build Your Value Scale First
Values mean light-to-dark steps. Draw a scale now. Make 10 bars side by side. Start white on one end. End black. Fill each with even grays. Smudge or layer for smooth shifts.
Use it to match tones. Hold against a real apple. Find the mid-gray side. Copy that. This tool ensures even shading. Check tones against it often.
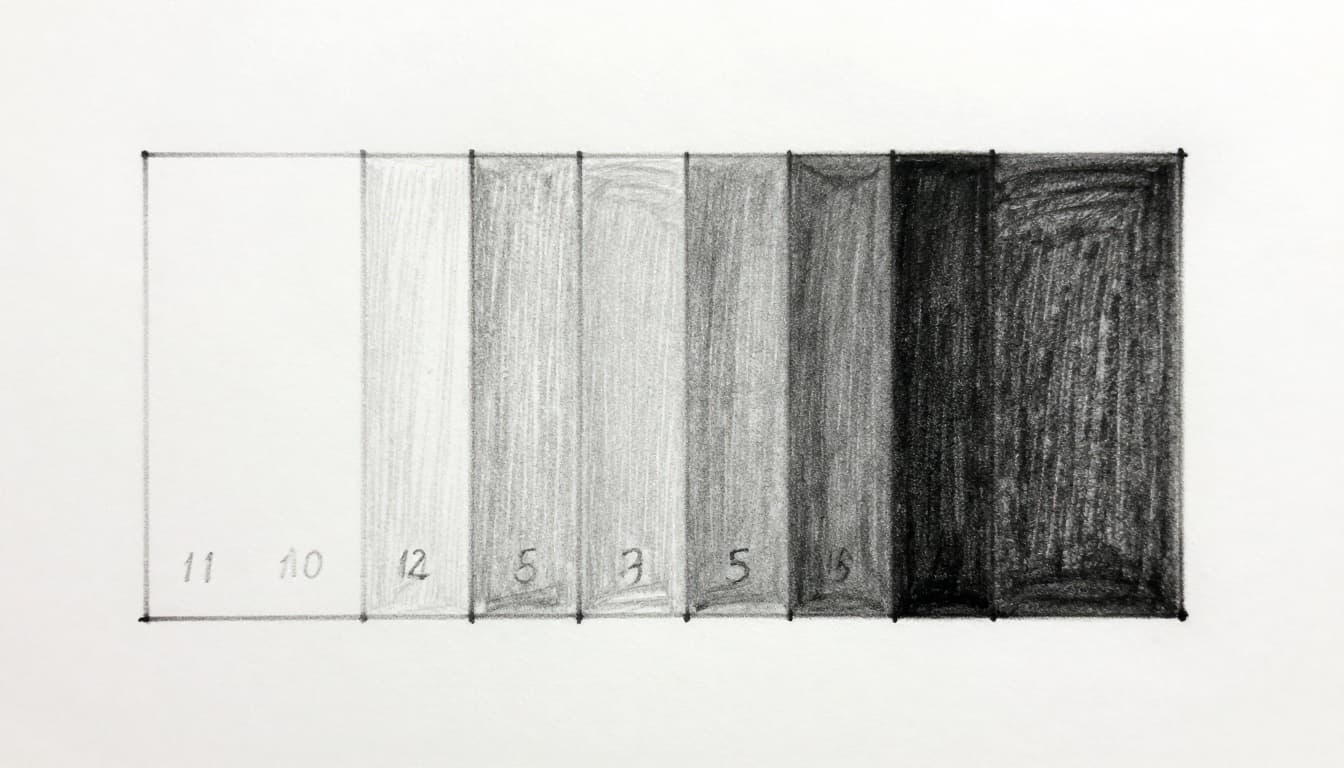
See this scale example. It guides consistent tones. For more on scales, try this value scale tutorial. Practice matching objects daily. Your shades improve right away.
5 Proven Shading Techniques to Make Drawings Pop
Techniques control value changes. They build depth fast. Top ones include hatching, cross-hatching, blending, stippling, and value zones. Each suits different textures. Hatching gives clean lines. Blending smooths skies.
Mix them for 2026 hyper-real looks. Artists layer light hatching under blends now. Test on spheres or cubes first. Pick based on your style.
Hatching: Layer Lines for Smooth Value Builds
Draw parallel lines. Space them wide for light areas. Pack tight for darks. Vary pressure for grays.
Start light. Add layers. A cylinder works great. Light from left means loose lines there. Dense on right.
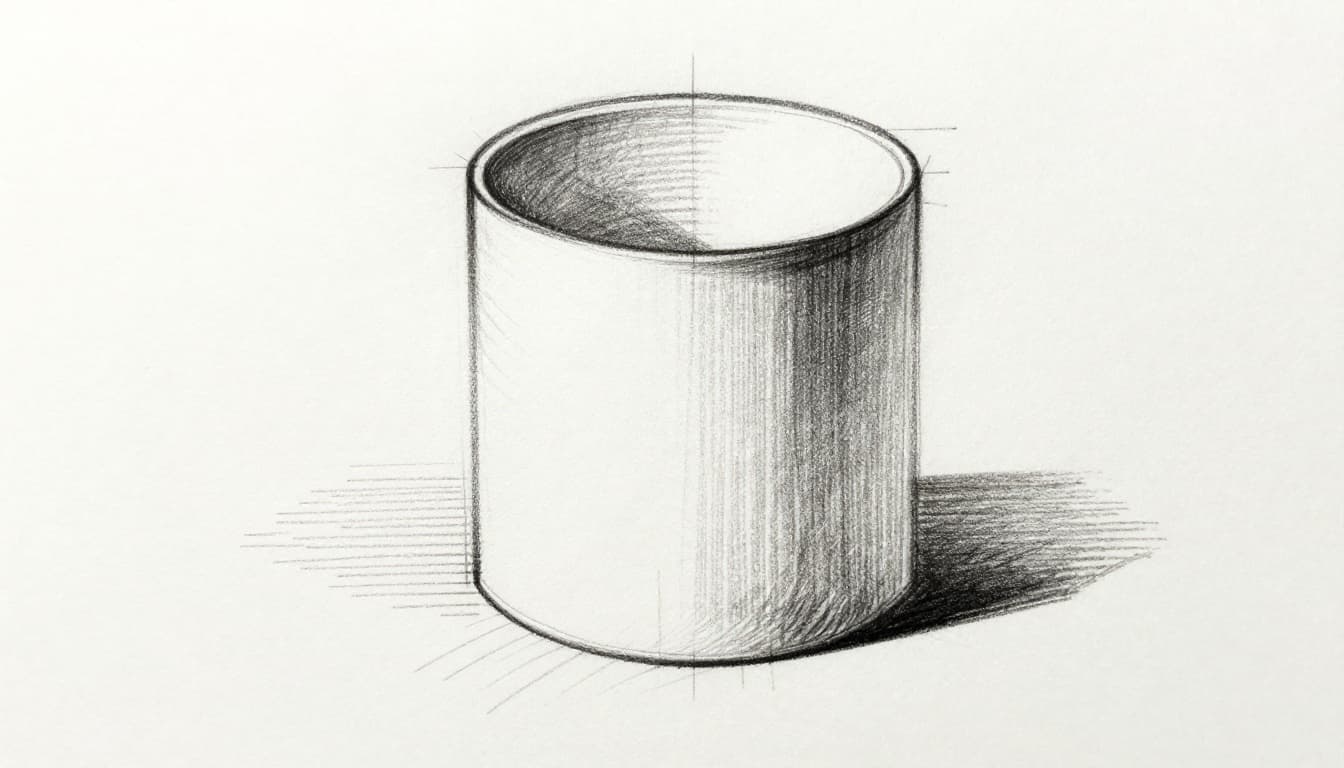
Pros include precise control. It shines on fabrics or metal. Keep lines even. Practice builds speed.
Cross-Hatching: Cross Lines for Rich, Dark Areas
Layer hatches at angles. First set horizontal. Next diagonal. Build fast darks.
Press light at first. Add passes. It suits deep shadows on curves, like an apple.

Avoid mess. Overlap clean. Great for hair or bark. For full techniques, check pencil shading for 3D depth.
Blending: Smudge for Lifelike Gradients
Layer graphite. Smudge with tortillon or finger. It creates soft fades.
Best for skin or skies. Keep hard edges for form. 2026 trends favor tissue blends for smooth hyper-realism.
Circular motions fill paper texture. Light touch avoids mud.
Stippling and Value Zones: Dots and Blocks Done Right
Stipple with dots. More dots darken areas. Slow but textured, like freckles.
Value zones block flat tones first. Refine edges later. Good for beginners. Builds big forms quick.
Step-by-Step: Shade a Sphere That Jumps Off the Page
Spheres teach form. Follow these steps. Confidence grows fast.
- Draw a circle. Set light top-left.
- Make your value scale. Pick tones.
- Block highlight at top. Add halftones around.
- Draw core shadow on right. Add cast below-right.
- Blend edges soft. Add reflected light bottom.
- Check contrast. Darken shadows. Brighten lights.
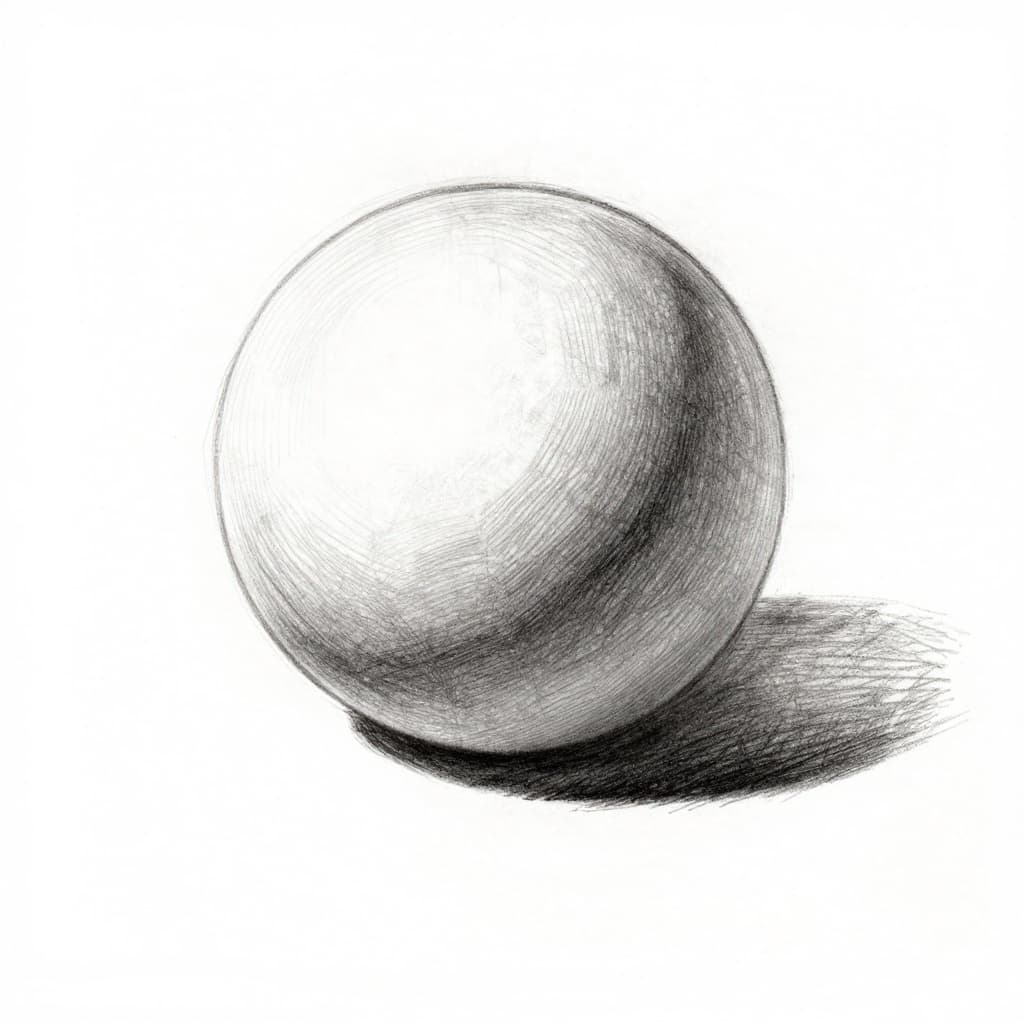
This finished sphere pops. Imagine flat circle before. Now it floats. Try cubes next. Light hits planes sharp.
For light elements, see Proko’s light and shadow lesson. Repeat twice weekly.
Layer Depth into Scenes with These Smart Tricks
Scenes need layers. Foreground gets dark details and warm tones. Midground blurs cooler. Background lightens with cool hues.
Overlap objects. Make far ones small. Atmospheric perspective fades edges. Ground with cast shadows.
A tree scene shows it. Trunk dark front. Leaves blur back. Size drops distant branches.
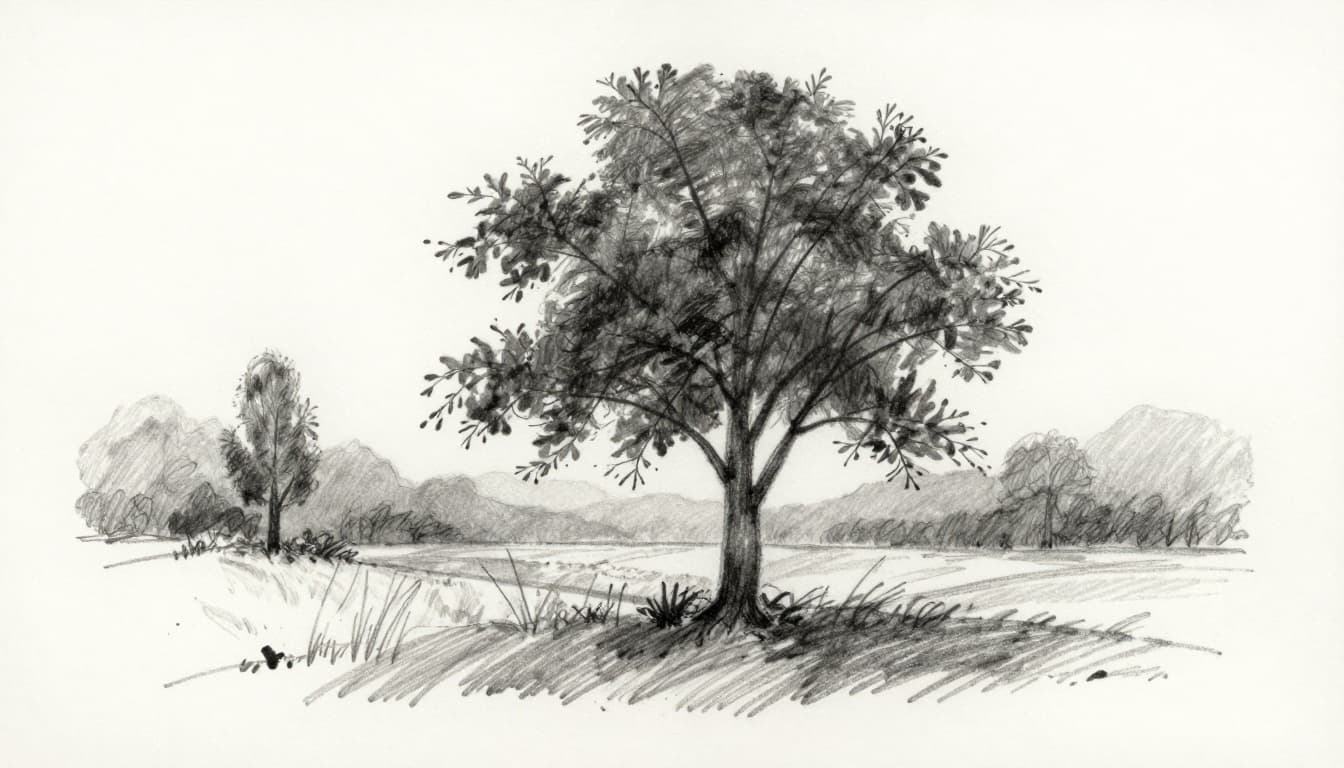
These tricks tie techniques. Depth emerges natural.
Avoid These Shading Mistakes That Flatten Your Art
Flat values kill volume. Vary tones wide. Use your scale.
Wrong light direction confuses forms. Pick one source. Follow through.
Over-blending loses edges. Keep some crisp for turns.
Skip cast shadows. They anchor objects.
Equal detail everywhere bores. Save fine work for front.
Fixes work quick. Check light logic first. Squint to spot values. For more, read common shading fixes.
Self-check: Does it turn in space? Adjust.
Quick Daily Exercises to Sharpen Your Shading Fast
Spend 10 minutes daily. Shade a sphere. Note light spots.
Next, cube. Planes sharpen skills.
Cylinder follows. Curves challenge hatches.
Value map scenes. Block tones rough.
Copy real objects. Match shadows exact.
Ink hatching drills control.
Build scenes layer by layer.
Track progress in a book. 20 minutes daily shows gains fast. March 2026 artists swear by micro-shades and earth tones for real feel.
Shading masters light rules and techniques. Practice turns flat sketches three-dimensional. Start with that sphere today.
Share your shaded sphere in comments. Which technique clicked first? Subscribe for more drills. Your art gains pro depth soon.